Hello, friends, family, yogurt-lovers, and do-it-yourself-ers:
For the last year, I’ve been developing a small business called Kleynhuis, and this week I’m launching my first product!
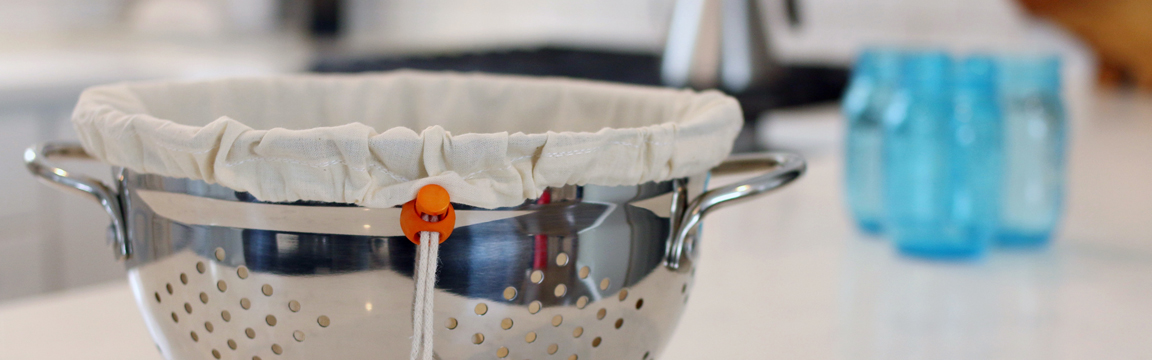
 I’ve enjoyed making my own yogurt for a long time, so while I was perfecting the yogurt-making art, I was also trying to come up with a way to make the straining process easier and less messy. If you like Greek yogurt or just very thick and creamy yogurt, the step of straining off the whey is key, and I think using my Kleynhuis Greek Yogurt Strainer Pouch is the best way out there (or the best whey, if you prefer puns).
Help me launch my new company and product!
Here are the top ways you can help launch my company and new product:
- Check out my Kleynhuis Greek Yogurt Strainer Pouch on Amazon: Easy Clean Nylon or Organic Cotton versions are available. Buy one, use it, and write a review. (Bonus: take a photo of you using it and post it with your review!) Getting initial sales and reviews are key to gaining momentum and trust with future buyers!
- If you aren’t a Kitchen DYI-er, I’m sure you know people who are, so please share my Kleynhuis web site or Amazon products with them!
- Check out and subscribe to my Kleynhuis YouTube Channel for tutorials on how to make yogurt and other recipes that either use my products or I just plain love.
- Join my Kleynhuis Product Testers VIP Team on Facebook. Here is where I will post exclusive offers, look for willing product testers, and ask for opinions on current and new products. Starting a new business has been an overwhelming process and I’d love to have you be a part of this group!
More about The Kleynhuis Greek Yogurt Strainer Pouch
The benefits and features: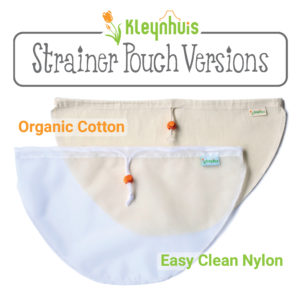
- Strains a full gallon of yogurt at a time. Most other yogurt straining products can only strain a half gallon at a time and when you taste your homemade yogurt, it will go fast!
- Can be used with any colander you already have in your kitchen (10.5” diameter or less) and turns it into an ultra-fine food strainer.
- Two versions: 1) Easy-clean 100 micron nylon. Most other food straining bags/liners are 200 micron or more, and the lower the micron number, the finer the strain. 2) Organic Cotton. For those who love everything natural.
- Comes with its own zip-shut bag that keeps it clean between uses and fits easily in any drawer.
- Comes with a cord lock to cinch around the top of the colander and keep it in place.
- Can be used to strain many other foods as well: cheese, cold brew, nut milks, and jams.
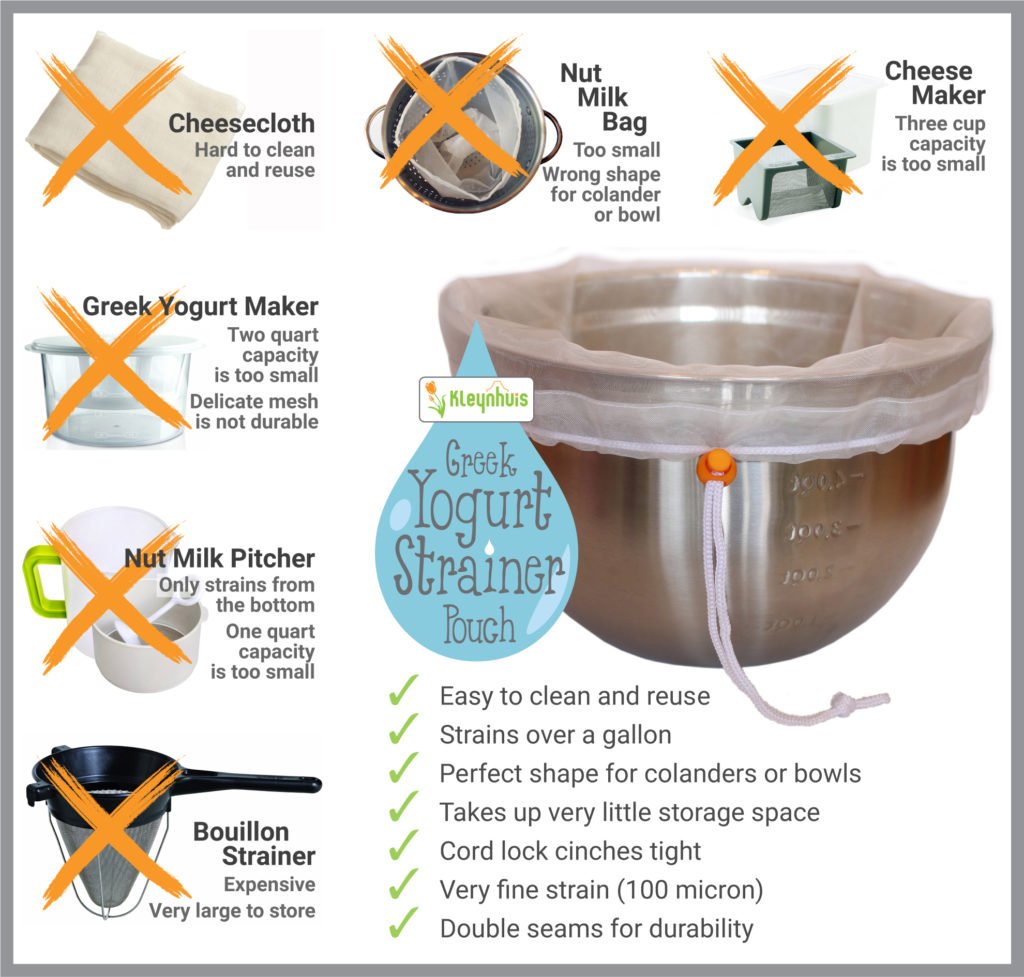
Better than any of the alternatives:
- Cheesecloth, the traditional straining method. The problem with cheesecloth is that to get a fine enough strain, you must use many layers, making it hard to clean. The alternative is throwing it away after each use and that’s just plain wasteful.
- Nut milk bags. I’ve heard of some people using these to strain yogurt, but the opening is not designed to be wide enough to fit around a colander and they are too tall and square to conform well to a round bottom.
- Euro Cuisine Greek Yogurt Maker. Only strains up to 2 quarts at a time and not very durable.
- KitchenWize Nut Milk & Greek Yogurt Strainer. Only strains from the bottom (whey naturally rises to the top) and the strainer only holds 1 quart of yogurt…not enough at all!
- Cuisipro Donvier Yogurt Cheese Maker. Only holds 3 cups of yogurt at a time and is yet another item to store in your cupboards.
- Matfer Bouillon Strainer. When first researching how to best strain yogurt, this is the item I considered for a long time. It came highly recommended by some foodie bloggers and here’s why I also most bought it: It’s washable, durable and reusable; strains very fine; and can be used to strain multiple foods. But here’s why this kitchen tool (while very impressive) didn’t end up in my cupboard: 1) The price tag: $75-$100. Ouch. 2) Only holds up to 2 quarts of yogurt. 3) Size: 16 x 8 x 10 inches. I simply do not have that much cupboard space to give up.
- Kleynhuis Yogurt Strainer Pouch. Well, I think it’s just plain perfect for straining yogurt. Let me know what you think of it and how you use it!
Thanks in advance for your support of my exciting new venture! One klein (“small”) step for Wendy; one groot (“large”) leap for yogurt-making!*
Dank je!
Wendy

PS: *My mom’s maiden name was Kleyn and she got married and became Mrs. De Groot. Growing up, I always thought it was a fun parental anecdote that Miss “Small” married Mr. “Big.”
I am confused about refrigeration while the yogurt is straining. One reference that led me to your product discussed hanging the bag from a cupboard.
1. Several blogs recommended refrigeration for several hours prior to straining.
2. Most discuss putting the strainer in the refrigerator while draining.
What do you suggest?
Hi, Joan:
This is a great question. After time and experimentation, I think yogurt-makers come up with the method that works best for them, so there is not really a “right” way. I love yogurt that is really creamy and not as thick as typical Greek yogurt, because we always add ground flax seed to our yogurt, which obviously will make it even thicker (and more nutritious!). To achieve this, once my yogurt is set, I use my Kleynhuis pouch over a colander and strain it at room temperature for two hours, blend the strained yogurt in my mixer to give it that creamy texture, then transfer it to the final jars and put them in the fridge. When it cools down, the yogurt will thicken up more. I’ve personally found that if I strain my freshly-made yogurt in the fridge for two hours, then mix it, the result is a thinner yogurt.
That said, if you want a really thick, Greek-style yogurt, you will want to strain your yogurt longer (5-10 hours). This can be done on the counter or in the fridge. You could try it both ways and see if you prefer one to the other. Paula from https://saladinajar.com has many great yogurt-making ideas, which is probably where you saw my product reviewed and hanging from her cabinet door. She has found that by doing this, the weight of the yogurt will cause it to strain more rapidly. So, if you are crunched for time, you could try this as well. I do not think, however, that there are any advantages to refrigerating your yogurt before straining it (to me that would just add an unnecessary step and time to the process), but am always happy to hear other opinions and methods!
I hope this helps. Feel free to reach out with any more questions.
Wendy
Can you explain the difference between your heating and cooling times. Normal setting on the instapot rings at 180. You ask for more and allow for a higher cool down temp. Another question is about the addition of any flavoring. I used a vanilla bean paste in the yougurt making when adding the culture and it changed the entire process. I suppose it will be better in the cooling process?
Thanks for the question, Yvette. I arrived at my scalding and incubation temperatures after reading Harold McGee’s book, On Food and Cooking: The Science and Lore of the Kitchen. Because of the science behind denaturing the proteins, Harold says to “cook the milk for 30 minutes at 185°F/85°C or at 195°F/90°C for 10 minutes.” He also says that the fermentation/incubation temperature “has a strong influence on yogurt consistency.” Basically, he says that the lower the incubation temperature, the slower the proteins will gel. “Rapid gelling produces a relatively coarse protein network whose few thick strands give it firmness but also readily leak whey; slow gelling produces a finer, more delicate, more intricately branched network whose individual strands are weaker but whose smaller pores are better at retaining the whey.” He lists 104–113°F (40–45°C) for rapid gelling and 86° (30°C) for slow gelling (but this may take up to 18 hours to set).
Since 104°F is the lowest temperature that my Instant Pot Ultra will go, that’s how I arrived at my incubation temperature. If my Instant Pot Ultra had a lower setting, I might experiment with lower incubation settings. It takes my yogurt about 10 hours to gel.
Yes, as you found out, don’t add any flavorings to the yogurt until it is completely finished processing. I like to blend my yogurt in a mixer before putting it in the fridge so that it has a very creamy texture. That would be the perfect time to add your vanilla bean paste. Yum!
Wendy
Hi Wendy,
Do you know if your product can be used to strain kefir?
Dawn
Hi, Dawn:
I’m sure that a Kleynhuis Pouch would functionally work for straining kefir, but it may not be the size you are looking for, unless you make kefir in large batches. When I was making kefir, I just used a small hand-held stainless steel strainer that fit on the top of my mason jars and that seemed to work well. But, if you make kefir in large batches that would call for straining on top of a large pitcher (with the pouch synched around the top), I can see the Kleynhuis Pouch working well for that. Let me know how it turns out!
Dank je,
Wendy
Hello Wendy, I would like to buy your pouch (and hope it is good for kefir as well as yoghurt) but amazon does not ship this to Australia. Do you have a distributor here or can I buy directly from you?
Hi, Donalee:
Unfortunately, I’m not set up to sell to Australia yet, but hopefully one day… 🙂 I’ve not used my pouches for straining kefir, but would love to hear from any who has had success in using a Kleynhuis Pouch for that purpose.
Dank je,
Wendy
I keep checking just in case shipping to Australia has opened up. Hopefully soon!
Hopefully in the next year. Feel free to contact me and I’ll see if there is something I can do in the meantime. 🙂
Wendy
We bought the nylon large bag we like it a lot but notice that it’s not available on Amazon for $15. How soon with this be available as we want to buy more for our children thank you
Thanks for asking. Good news! The nylon version of the Kleynhuis Pouch is back in stock! I’m very sorry for those of you who have been waiting…the manufacturing took much longer than I expected.
Dank je,
Wendy
I just received my cotton yogurt strainer pouch in the mail and have two questions. What is the difference other than material between this one and the nylon one? Do you cinch your bad closed when straining your yogurt?
Hi, Jenny:
Thanks for the question. Since the design is the same, it is really a matter of personal preference when choosing between the nylon and cotton version of the Kleynhuis Pouch. I use both and find the yogurt results to be the same. I slightly prefer the nylon version because it dries faster, but I know many prefer cotton because of its organic properties.
I personally don’t cinch my bag closed when I’m straining my yogurt since I have a cover that fits over my colander. But you certainly can cinch it closed. (You will need to wait about 5 minutes for some of the whey to strain off before you are able to fully cinch it closed if you are straining a full gallon.) If you do this and rest a small plate on top, along with something else to add a little weight, you may find that you can speed up the straining.
Hope that helps!
Wendy
Hello,
I’m located in Canada and on Amazon Canada your cotton pouch is about 20CAD but the nylon version is 65CAD. Where can I find the nylon version at the same price than the cotton one, for delivery in Canada? Thanks in advance!
Fred
Good news! My first shipment of the nylon version of the Kleynhuis Strainer Pouch is on its way to Canada, so you should see it listed on Amazon.ca soon!
–Wendy
Hello Wendy, the nylon bag is available on amazon.ca – for cad $63.97 + tx. I have the same question as Frederic above. Where can we buy it for close to the US price? Thank you.
Good news. The nylon version of my pouch is now also available on Amazon.ca. Thanks everyone for your patience!
Wendy
I am now using your bag for Icelandic yogurt – much thicker than Greek yogurt. I use the whey in a 50/50 mix with water to feed my garden.
Also, for those interested there is a Mediterranean version of “yogurt” called “labna” or “labneh”. It’s made with salted yogurt, strained to a thick consistency and is infused with herbs. They also make “labna balls” from the thickened labna. Check it out. I think I’ll play with that next time.
Pingback: Have yogurt… now what? What I Make with Yogurt – Simply Kyra